
-
Similar Content
-
 By TEO_911
Подскажите плиз! Почему я создаю в HTML тег " " в него закладываю "UL" и LI, а в "LI" текст которому хочу придать нужное изображение. В CSS делаю селектор - .menu, прописываю туда правила, но почему то это не влияет на LI, что бы изменить текст, мне приходится прописывать правила непосредственно для "LI". в чем причина?, и как сделать так что бы правила для блока .menu распространялись на текст внутри его? Ведь LI я хотел добавить еще в некоторые блоки уже с другими правилами.
<!DOCTYPE html> <html lang="en"> <head> <title>MySite</title> <meta charset="utf-8"> <link rel="stylesheet" href="text/style.css"> </head> <body> <header class="page-header--home"> <div class="menu"> <ul> <li>Группа творчества</li> <li>Статьи</li> <li>Форум</li> <li>Видео</li> <li>Вход</li> </ul> </div> </header> </div> <div class="avtorizacia"> <input type="submit" name="Поиск"> </div> </body> </html> body{ background-image: url(..//img/MS3.jpg); max-width: 1920px; margin: 0; margin-top: 0px; margin-right: 0px; margin-bottom: 0px; margin-left: 0px; } .page-header--home{ position: relative; background-image: url(..//img/MS4.jpg); width: 1920px; height: 80px; margin-top: 0px; } ul{ position: relative; margin: 0px; } li{ display: inline; font-size: 32px; font-family: "Tahoma"; font-weight: 800; color: #45a8ff; margin: 0px; margin-top: 5px; margin-left: 80px; margin-right: 80px; } .avtorizacia{ position: relative; background-color: rgba(31, 16, 16, 0.75); max-width: 80px; height: 250px; margin-top: 100px; }
-
 By ErUnDAK
Дан код:
<style> a { display: inline-block; margin-left: 5px; } .loli { height: 75px; width: 100%; display: inline-block; background-color: #0099cc; left: 600px; } .loli ul { padding: 0; margin: 0; font-size: 0; overflow: hidden; text-align: center; } .loli ul li { display: inline-block; list-style: none; font-size: 36px; } .loli ul li a { color: #fff; text-decoration: none; height: 75px; line-height: 75px; padding: 0 15px; position: relative; z-index: 10; } .loli ul li a:hover { color: black; } .loli ul li a::before { content: " "; position: absolute; left: 0; top: -25px; width: 100%; height: 150px; transform: rotate(14deg); background-color: rgba(255, 255, 255, 0.3); opacity: 0; z-index: -1; } .loli ul li a:hover::before { opacity: 1; background-color: #fff; } .menu li ul li { padding-right: 15px; background: #0099cc; } .menu li ul { position: absolute; display: none; z-index: 10; margin-left: -18px; } .menu li:hover ul { display: block; } .menu li ul li { display: block; } </style> <div class="loli"> <div class="menu"> <ul> <li><a href="">Главная</a></li> <li><a href="">Новости</a> <ul class="menu"> <li class="menu"><a href="">Расписание</a></li> </ul> </li> <li><a href="">О группе</a> <ul class="menu"> <li class="menu"><a href="">Профессия</a></li> <li><a href="">Успеваемость</a></li> </ul> </li> <li><a href="">Здание</a> <ul class="menu"> <li class="menu"><a href="">Расписание</a></li> </ul> </li> <li><a href="">Контакты</a> <ul class="menu"> <li class="menu"><a href="">Расписание</a></li> </ul> </li> </ul> </div> </div> Как мне сделать, чтобы класс "меню" не затрагивал класс "лоли"?
-
 By Melodyn
Здравствуйте, меня зовут Игнат, и я люблю писать код без кавычек.
Собственно: https://jsfiddle.net/066hbnxf/ - на Хром и Опера без кавычек срабатывает только первый класс.
Может, с HTML5 пришёл новый метод перечисления классов, или это "недопилили"?
-
 By Алексей2802
Здравствуйте, уважаемые!!
Начну с того, что перерыл весь интернет по данному вопросу. Нашел только про картинки (img) с определенными id, что мне не подходит.
А вопрос такой:
При нажатии на div с классом "small", который находится в ячейке таблицы, надо его увеличить на пол экрана, создав затемнение тела сайта. При этом ячейки не должны изменять размеры. При повторном нажатии, либо нажатии вне этого дива, вернуть его в исходное положение.при этом ячейки не должны изменять размеры.
https://jsfiddle.net/x7106joc/3/
Заранее благодарен.
-
 By Dragomir
Добавляю class к изображению которая находятся в div и в css добавляю нужный код и не работает . Помогите !
———--HTML——————
<div class="content">
<img src="images/home.png" class="lol">
</div>
————-CSS—————-
.content .lol {
margin: 0 auto;
position: absolute;
top: 0;
left: 190px;
}
—————————
Где ошибка ? Помогите ...
-
-
Обсуждения
-
 Доброго всем времени суток. Прошу помощи. Научите принципу изменения футера. Движок Xenforo. Версия 2.2.10. Стиль дефолтный. Что именно нужно в итоге на фото примере. Мой шаблон app.footer less имеет следующее значение. .p-footer { .xf-publicFooter(); a { .xf-publicFooterLink(); } } .p-footer-inner { .m-pageWidth(); .m-pageInset(); padding-top: @xf-paddingMedium; padding-bottom: @xf-paddingLarge; } .p-footer-row { .m-clearFix(); margin-bottom: -@xf-paddingLarge; } .p-footer-row-main { float: left; margin-bottom: @xf-paddingLarge; } .p-footer-row-opposite { float: right; margin-bottom: @xf-paddingLarge; } .p-footer-linkList { .m-listPlain(); .m-clearFix(); > li { float: left; margin-right: .5em; &:last-child { margin-right: 0; } a { padding: 2px 4px; border-radius: @xf-borderRadiusSmall; &:hover { text-decoration: none; background-color: fade(@xf-publicFooterLink--color, 10%); } } } } .p-footer-rssLink { > span { position: relative; top: -1px; display: inline-block; width: 1.44em; height: 1.44em; line-height: 1.44em; text-align: center; font-size: .8em; background-color: #4682B4; border-radius: 2px; } .fa-rss { color: white; } } .p-footer-copyright { margin-top: @xf-elementSpacer; text-align: center; font-size: @xf-fontSizeSmallest; } .p-footer-debug { margin-top: @xf-paddingLarge; text-align: right; font-size: @xf-fontSizeSmallest; .pairs > dt { color: inherit; } } @media (max-width: @xf-responsiveMedium) { .p-footer-row-main, .p-footer-row-opposite { float: none; } .p-footer-copyright { text-align: left; padding: 0 4px; // aligns with other links } }
 -
 Нужны сайты с примерами верстки, типа https://css-tricks.com/. Типовые приемы и нестандартные на все случаи жизни. Накидайте ссылок.
 -

By Katerina23 · Posted
Да, подходит. Спасибо. -
 <input type="number">
 -
By Katerina23 · Posted
Здравствуйте, подскажите какой тег использовать для увеличения значения, пример на картинке. Вроде, про такой тег я слышала. Если есть тег прогресс бар, значит и такое должно быть.
-
Question
Vasilyyy
Доброго времени суток. Я начинающий в изучении JavaScript. Во время моих уроков я столкнулся с проблемой, которую не могу решить уже 4 дня. Она состоит в том, что при первом клике значок переворачивается на 180 градусов направо, а по следующему клику он должен крутиться в реверсе. В чем я допустил ошибку? Вот код, который я использовал в письменном виде:
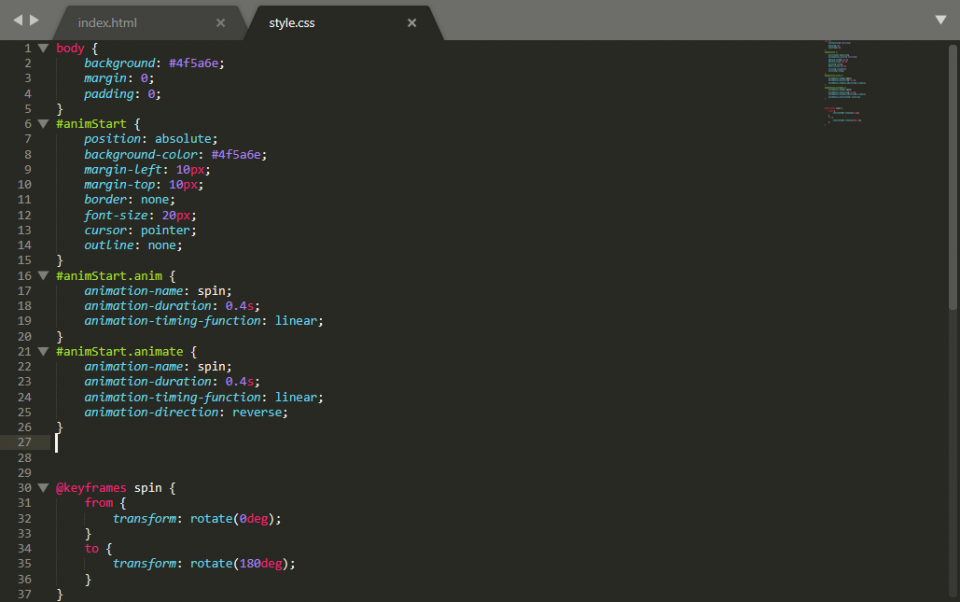
Edited by VasilyyyLink to comment
Share on other sites
1 answer to this question
Recommended Posts
Join the conversation
You can post now and register later. If you have an account, sign in now to post with your account.
Note: Your post will require moderator approval before it will be visible.